| I N T H I S I S S U E | ||||||
|
The Options of AutoCAD 2010 – Display Tabs -- Display Tab - Part 1 -- Display Tab - Part 2 -- Display Tab - Part 3 -- Display Tab - Part 4 Revit Options 2010 – Rendering Tab Installing Revit on a Mac Book Review – Revit Architecture 2010 – No Experience Required
Survey Results
from February 2010 |
The Options of AutoCAD 2010 – The Display Tab - Part 1 Before we start down the Display Tab, lets point out that the Hover Tool Tips will show you what each check box will do. Just hover over the button and see the tips.
Now moving on to the Display Tab When you open the Options Dialog box – it will open on the last tab you selected. If that was not the Display Tab – then choose the Display Tab
Once open you will see the first area of our discussion.
The Options of AutoCAD – The Display Tab - Part 2
In general – leave all of these as they are. This area controls options for existing and new layout tabs. A layout is a paper space display of model space entities in which you can set up drawings for plotting. Display Layout and Model Tabs Display Printable Area
| The Options of AutoCAD – The Display Tab - Part 3
Before we delve into the Display Resolution area… Let’s discuss the following icons…
Notice at the top of the dialog box – this means that the variable that is flagged with this symbol next to it is stored in the drawing file only. All others are stored in the registry and apply to all drawings. Display Resolution area This controls the quality of the display of objects in your drawing. Be careful not to set these too high – it will impact performance.
Arc and Circle Smoothness
The Options of AutoCAD – The Display Tab - Part 4
Finishing up on the Display Tab…
Crosshair size Sets the size (percentage) of screen real estate that is taken up by the crosshairs. Xref Display This option only affects the display on the screen. It does not affect plotting or plot preview.
Revit Options 2010 – The Rendering Tab Click the Rendering tab of the Options dialog to specify paths for files used for render appearances and decals, and to specify the location of the ArchVision Content Manager (ACM), if needed.
Render Appearance Library Location If you move the Render Appearance Library from its default location, use the Rendering tab of the Options dialog to specify its new location. The Render Appearance Library is a read-only library that stores all render appearances for materials, the default RPC content provided with the software, and related rendering information. When you install Revit Architecture, this library resides in the following default location: C:\Program Files\ <product name and version>\Data\Rendering\assetlibrary_base.fbx If necessary, you can move the Rendering folder but I would not advise that – it just clutters up your install and updates.
Installing Revit on a Mac I recently installed Revit 2010 on a MacBook Pro. The MacBook had Boot Camp installed and also VMWare Fusion 3. The install went onto the Boot Camp partition fairly easily. The Boot Camp partition was Windows XP. I installed Revit 2010 on my PC laptop with Windows 7 – so I am testing it out on that also. Using Boot Camp is better with VMware Fusion. I no longer have to choose between Windows and Mac at startup. I can run my Windows partition side-by-side with the Mac OS. VMware Fusion automatically recognizes my Boot Camp partition and lets me run it concurrently with the Mac. I can also run it in Unity mode which makes the partition sit right alongside my Mac programs as if it were part of the Mac OS.
You can also go to Full Screen to see the entire Revit program. Just click on the VMWare option…
Book Review – Revit Architecture 2010 – No Experience Required Starting at the beginning is a challenging undertaking for some, but Eric Wing has created a book that starts from the very first step into Revit for those who have never journeyed down that road before. But there are plenty of tips, tricks and wrnings along the way to bring an “ah ha” moment to any Revit user.
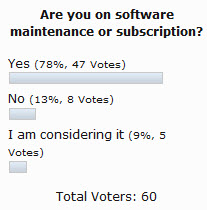
Eric starts at the very basic level of the user interface, but takes an in depth level of explanation so that what obvious to long tern users is not missed by those that are joining the Revit movement. Survey Results from February 2010 Straight Yes or No on this one... well plus one more...
Take the latest Poll... How Social are you? What online social tools are you connected to?
|
You can follow me on twitter... Do you tweet or follow those who do?
|
|
Received this by mistake? |


|
WELCOME |
|
March - 2010 More Options... Continuing the Options posts as we "march" along :) This issue contains more about Options - Inside AutoCAD
2010 and Revit Architecture 2010. Mark W. Kiker, Editor |
|
SURVEY - POLL |
|
How Social are you? What online social tools are you connected to? There is a poll on
the right column of the
|
|
|
|
|
|
ON THE BLOGS |